


Post by ℓacey ☀️ on Jul 23, 2021 8:46:34 GMT -5

so, we're going to be jumping down to a totally different area of the baby file for this lesson, because i think it's really important to understand this section first before moving on to the rest of the baby. a lot of things won't fully make sense until we cover this part, so i'm getting it out of the way now!
babyz are comprised entirely of little balls that are connected to make up the shape of their body. a baby's skeleton looks like this:

image credit to kay
each and every one of the balls you see above has a specific name, as well as a ball number that is used throughout the file to refer to that ball. for example, the baby's head is ball #63, while the baby's belly is ball #4. you can find a full list of all the baby's ball numbers in LNZ pro, by clicking insert > ball number.

don't forget to swap it to the "babyz" tab at the top:

this list will become an important reference to you as you start doing more hexing!
so let's look at betsy's file again and scrollllll down down down until you reach the section titled [Ballz Info]. it is towards the bottom of the file, and it looks like this:

this section is dedicated to all of those balls making up the baby's body. each line you see here is for a different ball. because babyz are made up of so many balls, it can be very difficult to tell which ball is which when you are editing the baby's file. for that reason i find it easier to label my balls so i can see what i'm doing. if you would like to do that (and i strongly recommend it), i have the section all labeled out and ready to copy/paste here in this thread at the bottom!
now, let's look at the first line of this section together:
45 18 0 -1 -2 0 8 -1 ;ankleLas you can see from my helpful label, this is betsy's ankle ball!
the first number you see here (45) is the color of the ankle ball, aka betsy's skintone. the second number (18) is the outline color of the ankle ball. the next few numbers pertain to a few different things such as fuzziness of the ball (this is the first -1), outline thickness (this is the -2), and the very last ball refers to the texture. if you recall from our first lesson, the textures are referred to by number according to their position in the texture list. however, betsy's ankle is a solid color, so it does not use any texture. that's why this number is set to -1. if you were to change that last number to a 3, for example, her ankle would then show up as the same texture as her hair.
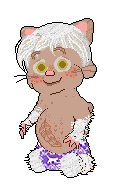
you can change these numbers to alter these aspects of a baby's body. for example, if you wanted to change a baby's skintone, you would just go down the list of balls changing all the 45's to the new color you wanted. i modified the ballz info on my baby, arthur, who is based on my real life cat; i changed parts of his limbs to have a higher fuzziness and gave them a white hair texture to give his skin the appearance of fur.

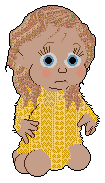
so let's go ahead and change betsy's skintone. change all of the 45's in the first column of the [Ballz Info] section to 34's-- a pretty milk chocolate color! if you have done this correctly, betsy should now look like this:

now you may notice after changing the skin color on a baby this way, a few other things may not look quite right. for example she still has two little balls next to her nose that show up in her previous skintone. her mouth color is still the same as well, so it sticks out and looks a bit too light for her skintone. so after you change a baby's skintone you'll want to go change a few other areas to make her whole body match.
the first area we're going to adjust is the mouth color, which is located directly above the [Ballz Info] area we're already working on, under the heading of [Polygons].

when you're trying to find colors that work together nicely on a baby, a great resource is the body part colors page on babyz.org, which has previews and suggestions of different colors that look natural together. on that page, they show a baby with darker skin with a mouth color of 212, so that's what we're going to go with for betsy. let's change all of the 49's in the polygon section shown above to the number 212.
after that, we'll fix her nose balls. the nose balls are located in the [Add Ball] section towards the top of the file. scroll up until you get to that section, which looks like this:

the lines we are going to change for the nose balls are the two i've highlighted in the screenshot above. there, you simply change the 45's to 34's like we did when changing the skin color.
finally, we're going to change her eyelid color. now, you might be thinking, "oh! professor lacey! i know how to change the eyelid color! it's right there in the same screenshot above add ball, where it says 256 eyelid color, right?"
this is a fully reasonable assumption! however, it is wrong. changing that color does absolutely nothing, because babyz is silly.
what we're actually going to do is click on "ColourInfo" which is on the left sidebar of the program underneath LNZ, Child/Adult, and Picture.

clicking the colored box with "48" on it conveniently brings up the color picker window, which allows you to visually choose a color for the baby's eyelids. i liked the look of the color we used for the mouth, so i'm going to pick 212 for betsy's eyelids as well.
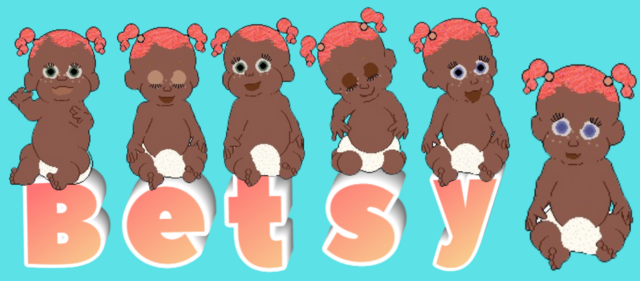
now, click ok and save betsy's file, and then we can open the game and see how we did! if everything was changed correctly (and you used the same colors as me), betsy should now look like this:

much better! those pesky balls around her nose are gone, and her mouth and eyelid color look nice and natural with her skintone. her freckles are still a bit light, but we'll get to that when we reach the paintballs section.

the last thing i am going to teach you in this lesson, since we are here anyway, is how to change a baby's eye color!
these two linez in [Ballz Info] are what we want to focus on for eye color:

so the balls that affect a baby's eye color work a little differently than the rest of the ball colors do. that's because a baby's iris is actually just a super thick outline around their pupil ball. so, when changing a baby's eye color, we are actually wanting to change the ball's outline color rather than the ball itself. if you remember from my description of the numbers in this section, the ball's outline color is the second number in the row, in this screenshot it is 112.
so to change betsy's eye color you would just change the 112 to another color. let's change it to a pretty purpley-blue, number 81 on the color chart.

that's all you have to do if you just want to change the iris and leave the pupil black. however you may have heard of a popular hexing trend in the community called firefly eyes. i believe in the petz community this has also been referred to as "blind eyes". basically this is where the pupil color is darker than the iris, but it is not fully black, creating a soft, often glowy effect. firefly eyes also creates more possibilities for eye colors than what the game gives us since the colors can give the optical illusion of different tones/shades depending on what colors you use together.
let's give betsy firefly eyes! go ahead and change the pupil color (which, remember, is the main ball color-- the very first number in the line, in this case 244) to 80. this is a slightly darker bluey-purple than the one we used for the iris.

i think she likes them <3
one other thing i want to mention here is how to change the sclera of a baby's eyes. sometimes if you're doing fantasy colors, the greyish-white of their eyewhites aren't quite bright enough. if you want to change the scleras, scroll to the eyeL and eyeR balls. if you didn't label your ballz info, these will be two balls starting with "15" right after a row of "13"s. change the 15's to the number you want for your sclera!
so now you should have a basic understanding of how the baby's body is put together and how to alter some important aspects of those body balls. now we can scroll back up to the top of the file and continue going section by section!

reply below to show me how you changed betsy's skintone and eye color!


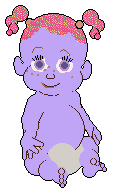


 I did it and she's only slightly scary looking